Home Diagnostic Tests for Thermador Ranges. Is your Thermador oven throwing error codes, not heating to set temp., or malfunctioning in other ways?
You may need to have your control board repaired by FixYourBoard.com, but the problem could also be failing hardware in your oven.
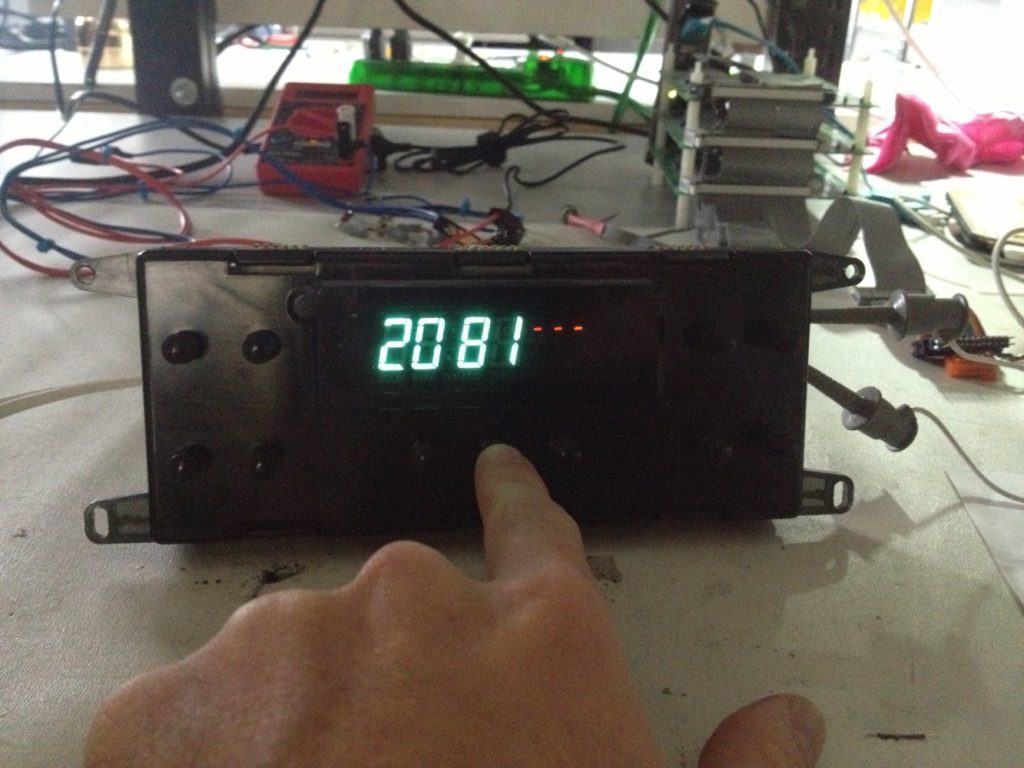
Luckily, these boards have a built-in diagnostic feature that can tell you where the problem is. To enter the diagnostic mode, you need to have the breaker to your oven shut off. Hold down the “Stop Time” button (center button) and have a friend turn the breaker back on. Until the button is depressed, the control will beep and show the microprocessor ID in blue digits and dashes in red digits. Once “Stop Time” is depressed, the control will stop beeping and show dashes in both the blue and red digits.
From here, you can test all the various functions of the oven control.
Holding any of the cooking buttons (Convection, Bake, or Broil) will energize that element relay while the button is held in, and the display will show “ON”. You should hear a *click* whenever the relay turns on or off. Depressing the button turns the relay off.
Holding the Clock button will energize the door latch relay and illuminate all display segments.
Holding the Stop Time button will cause the board to beep and show the same screen as when you entered Diagnostics: 4 digit Microprocessor ID and dashes.
Holding the Cook Time Button will show the EEPROM checksum in blue digits and the current oven sensor temperature in red.
Holding the Timer button will cause the control board to beep.
Holding the Clean button will reveal the current state of the door latch. Depending on which revision of the control board you have, there are 4 possible conditions, represented by either numbers 0-3 or 4-7…
- 0 or 4: Latch in transition between states. Unlock Switch 1 and Lock Switch 2 are both open.
- 1 or 5: Fully Latched (door closed). Unlock Switch 1 is open and Lock Switch 2 is closed.
- 2 or 6: Fully Unlatched. Unlock Switch 1 is closed and Lock Switch 2 is open.
- 3 or 7: Invalid Latch State. Unlock Switch 1 and Lock Switch 2 are both closed.
Pressing Cancel/Clear/Off will exit the Diagnostic Mode.
So, this is a powerful troubleshooting tool. For example, if your oven isn’t heating properly, use diagnostic mode to figure out which element isn’t heating. Hold Bake, you should hear the Bake relay click, and the Bake element (bottom) should heat as long as the button is held in. If you hear the click, but there’s no heat, check the wiring to the element and the element itself (hardware specs below). If the hardware is good, then the control board needs to be sent to FixYourBoard.com for repair. Even if the relay clicks, it can still have bad contacts.
Or, perhaps the oven isn’t heating properly because there is a failure in the temperature sensing circuit. Hold the Cook Time button to reveal the oven sensor temperature. If the oven has been idling at room temperature, then the red digits should display something around “070” (70 degrees). Anything drastically different than this means there is a definite problem. Check the wiring to the oven sensor and the sensor itself. If the hardware is good, then the control board needs to be sent to FixYourBoard.com for repair.
There are is a variety of possible failures for these ovens. Using the diagnostics mode can help you find which circuit is faulty, and then you can use the table below to determine whether it’s a hardware problem or control board problem.
DANGER HIGH VOLTAGE! You do not need power to the oven to make these measurements. Please cut the breaker.
| HARDWARE | TERMINALS | RESULT |
| Bake Element | E6** | 18-26 Ω |
| Broil Element | E7** | 12-20 Ω |
| Convection Motor | E2 to E8 | 55-80 Ω |
| Latch Motor | E2 to E5 | 835-870 Ω |
| Temperature Sensor | J1: pins 3 to 5 | ~1080 Ω at Room Temp |
**NOTE: The motors and sensor checks test the hardware and relevant wiring simultaneously. There’s no good way to test the heating elements and their wiring at the same time. Check the resistance of the elements at the ends of the element, and then individually inspect the wires from the ends of the elements.
This troubleshooting guide applies to the following Part and Model numbers…
Part Numbers: 14-33-347, 35-00-571, 35-00-751, 486752, 487604, 00486752
Model Numbers: RDSS30, RDDS30V, RDFS30, RDDS30VQB, RDF30, RDF30QW, RED30V, RDDS30VRS, RDDS30VQB, RDDS30, RDF30RS, RDDS30QW, RES30, REF30QW, RES30QB, RDF30QB, RED30VQRS, REF30QB, RES30RS, RDF30RS, RED30VQB, RED30VQRS, RED30VQW, REF30QB, REF30QW, REF30RS, RES30QB, RES30W and more.
Call FixYourBoard.com for more information!
Regardless of what you may hear, the control boards on all appliances are repairable. Many times, control board repair is the only option because they are obsolete or no longer available from the manufacturer. Call FixYourBoard.com to have your oven control board remanufactured quickly, with an industry leading two year warranty.


