
If you’re having oven issues and need to remove the faulty control board for service, you’ve come to the right place. We’ve provided instructions on how to remove your oven control board.
Removing the control board yourself is easy to do on most ovens. This posting shows the basic steps for removing a control board from a built-in electric Whirlpool model . A similar process applies to Kitchenaid, GE, Thermador, Dacor, Jennair and many others. This process is just as easy on most other oven brands and once you do it, you will be glad you tackled the job. All you usually need is a screw driver and a refreshing drink. This post covers the basic steps that one should follow.
1. Turn Off Power to Oven
This is the single most important step. This is for your safety and to protect the electronics of the oven. Removing power ensures that no wires will be shorted to other metal parts. This is done with the circuit breaker. Find the right one and make sure it turns off all lights in the oven and control panel.
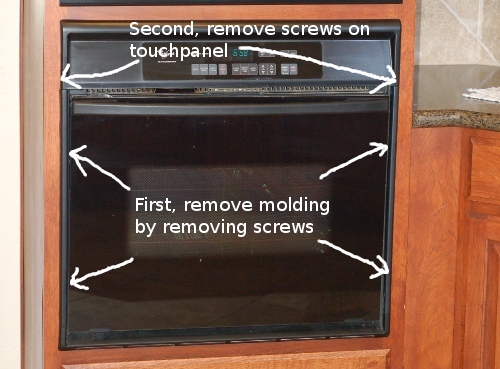
2. Remove Mounting Hardware

This whirlpool has mounting screws for the support brackets on the sides of the oven door. These can be removed by opening the door and removing the holding screws.
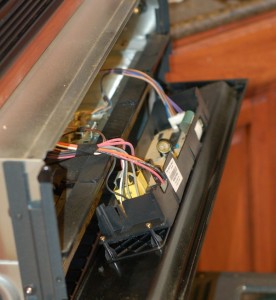
We also recommend labeling all of your wires and taking photos prior to disconnecting anything. This will help with reinstallation after the control board has been fixed.
Regardless of what you may hear, the control boards on all appliances are repairable. Many times, control board repair is the only option because they are obsolete or no longer available from the manufacturer. Call FixYourBoard.com to have your oven control board remanufactured quickly, with an industry leading two year warranty.


The specific models featured in this blog post are:
GBD277PDB09, GBD277PDB10, GBD277PDQ09, GBD277PDQ10, GBD277PDS09, GBD277PDS10, GBD277PDT09, GBD277PDT10, GBD307PDB09, GBD307PDB10, GBD307PDQ09, GBD307PDQ10, GBD307PDS09, GBD307PDS10, GBD307PDT09, GBD307PDT10, RBD245PDB14, RBD245PDB15, RBD245PDQ14, RBD245PDQ15, RBD245PDS14, RBD245PDS15, RBD245PDT14, RBD245PDT15, RBD275PDB14, RBD275PDB15, RBD275PDQ14, RBD275PDQ15, RBD275PDS14, RBD275PDS15, RBD275PDT14, RBD275PDT15, RBD305PDB14, RBD305PDB15, RBD305PDQ14, RBD305PDQ15, RBD305PDS14, RBD305PDS15, RBD305PDT14, RBD305PDT15, RBD306PDB14, RBD306PDB15, RBD306PDQ14, RBD306PDQ15, RBD306PDT14, RBD306PDT15, GBD277PDB6, GBD277PDB7, GBD277PDB8, GBD277PDQ6, GBD277PDQ7, GBD277PDQ8, GBD277PDS6, GBD277PDS7, GBD277PDS8, GBD277PDT6, GBD277PDT7, GBD277PDT8, GBD307PDB6, GBD307PDB7, GBD307PDB8, GBD307PDQ6, GBD307PDQ7, GBD307PDQ8, GBD307PDS6, GBD307PDS7, GBD307PDS8, GBD307PDT6, GBD307PDT7, GBD307PDT8, RBD245PDB11, RBD245PDB12, RBD245PDB13, RBD245PDQ11, RBD245PDQ12, RBD245PDQ13, RBD245PDS11, RBD245PDS12, RBD245PDS13, RBD245PDT11, RBD245PDT12, RBD245PDT13, RBD275PDB11, RBD275PDB12, RBD275PDB13, RBD275PDQ11, RBD275PDQ12, RBD275PDQ13, RBD275PDS11, RBD275PDS12, RBD275PDS13, RBD275PDT11, RBD275PDT12, RBD275PDT13, RBD276PDB11, RBD276PDB12, RBD276PDB13, RBD276PDQ11, RBD276PDQ12, RBD276PDQ13, RBD276PDS11, RBD276PDS12, RBD276PDS13, RBD276PDT11, RBD276PDT12, RBD276PDT13, RBD305PDB11, RBD305PDB12, RBD305PDB13, RBD305PDQ11, RBD305PDQ12, RBD305PDQ13, RBD305PDS11, RBD305PDS12, RBD305PDS13, RBD305PDT11, RBD305PDT12, RBD305PDT13, RBD306PDB11, RBD306PDB12, RBD306PDB13, RBD306PDQ11, RBD306PDQ12, RBD306PDQ13, RBD306PDS11, RBD306PDS12, RBD306PDS13, RBD306PDT11, RBD306PDT12, RBD306PDT13